Thursday 19 October 2023

Dining Chairs (part 2)

 Well.  Making the pattern was relatively easy.  The chairs have piping around the side and seat so I was able to use this as an 'edge' for the pattern making the outline my sewing line.  I made notes on each piece to state sewing and/or cutting line and as each piece was cut, I pinned them around the chair and adjusted where required.  Again relatively easy.

There were a few areas where I couldn't quite get the gist of how I was going to shape it but carried on regardless hoping that the sewing part would (hopefully) sort it out.  


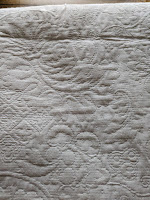
The chair remained in this state for about a week as I was trying to make a final decision on the fabric choice (see below).  My fabric choices, I thought, would need to accent the existing colour of the room - vintage cream and dark green (accent wall) - or be a total opposite to make a statement.  I found three different fabrics  - cream linen, gold(ish) brocade (I think its brocade anyway) and an embossed ivory upholstery fabric. I have yards of the cream linen so decided to use this as the first pattern trial.

cream linen  pre washed       gold(ish) brocade            ivory upholstery

Once I had the pattern cut and pinned, I had to decide how I was going to sew the front side corners. I had pinned them as you make a bed corner firstly with the excess fabric underneath the top and folding to the front, secondly with the excess folded to the side.  Either solution seemed reasonable.  However, once I came to sew the corners up, I realised that the excess fabric was going to cause more of a problem just being there so I simply pinned where the corner was, joining the front and side pieces together and sewed straight up.  I think once the fabric has been ironed/pressed it will sit better (no pun intended!) and will obviously soften the more it is sat upon.

So here are the photos of my 'maiden' chair cover.  There are still a few pattern issues to deal with but I am really chuffed with the result.  I now need to cut out four versions of the pattern and fit each one separately.  I have decided - if I have enough fabric - to cover two linen and two ivory upholstery.  Best of both worlds.  The gold(ish) brocade looks to be a little out of my comfort zone regards to preventing fraying so I have returned it back to my hoard stash for a different project.

Halloween is nearly upon us and my daughter has decided she going to host a pumpkin carving/film/birthday party this weekend for one of her bridesmaids.  Guess the table will see the light of day sooner than I thought.  Ah well. Gonna have to find some time between now and December to complete the four covers as we need them for Christmas Dinner!  See you soon. :)


Dining Chair Covers for Christmas

 So.  I know its been a while since I posted.  Not that I haven't been busy!!!  All the wedding place settings (Mad Hatter hats) are made, they just need ribbons and labels doing for them and that's not one of my jobs.  The basket for the cards has also been lined and the bunting done.  See photo.

I have walked, walked, bathed and walked (!!) doggies, made the most of the dry (when possible) weather and have managed to redo my garden and reseed the lawn following the last two clutches (!?) of ducklings destroying it.  I have also taken down most of the ivy growing along the back garden wall in the hope that Mrs Duck won't find anywhere to nest next year.  My intention is to keep it really, really, really short!  The ducklings are lovely but so much hard work and soooo many early mornings! Anyway, we'll see.

My days, when I don't have dogs, are now pretty quiet work wise.  So I thought I would challenge myself into doing something I've not done before.  I love sewing so a project was decided upon - whether it was a good one, remains to be seen but for the moment, I am excited and hopeful that I can do this.

As you can see from the photos, my dining chairs have seen better days.  Out of the six we have, there are about four which are really looking their age and the leather (if indeed it is leather??) has begun to perish and flake.  I clean the chairs regularly so I know its not dirt that is causing the problem but the chairs are wearing where the back of your legs rub.  I have seen covers being made for chairs like mine but thought I would have a go. 


My concerns at the moment are that all the ones I have seen are for straight backed chairs whereas my chairs have a curly bit at the top (see photo left).  I have read many tutorials for covers but none which really address this issue so I have stopped reading and am just going to approach the covers as if they were straight and deal with any hitches along the way (she said hopefully).

I found a clean but obviously faded valance sheet in my hoard stash of fabric as I needed something to make a pattern.  Using the measurements from the chair, I broke it down into two side pieces, one front including the curly bit, a straight back piece and the seat.  

I now have the basis of a pattern which will obviously develop through the process of pinning and then I can use it when I finally decide on a colour and fabric type for the covers.  I know they won't be stretchy ones as I do not use stretchy fabric and don't think that it would be durable enough for the chairs.  I guess now, the fun begins!  Wish me luck........ :)

Tuesday 4 July 2023

And Now for Something Totally Different.......

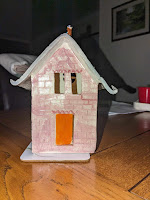
 So over the last 5 weeks The Family Betts - plus Tom - have been attending a pottery class in the village.  Me and my hubby, John, watch The Great Pottery Throw Down, every year and have often said we would love to have a go. Recently there has been a class advertised taking place in the village so we all signed up.  Unfortunately, due to work pressures, John has only managed to attend the one class but we very kindly (lol) used his four classes up between us and I have taken some photographs of some of my finished items.  There are more of them but as I only finished glazing the remaining pieces this evening, I will have to add these to a second post.

I have loved every single second of it.  I was very happy doing the slab building (tea light house) and the coil pot (photograph pending as it is currently being fired) but did not enjoy the pinch pot class even though I managed to make my little gnome - again photograph pending - or the potters wheel.  I think I totally zoned out on the wheel as I can not remember actually doing it but I have, as you can see one finished pot and two others (photograph pending).

Lynn has been a fantastic teacher and support and her positive comments have done my confidence the world of good, so much in fact I am hoping we can go again and this time, John finish the whole five weeks.  I would love to revisit the coil pot week as I completed my 'piece' over 2 weeks and going back to it I obviously had lost the keenness and there are a couple of coils which have 'dropped off'.  Once the piece has been fired, now it is glazed, I should be able to stick it back together, hopefully without losing its shape but I shall photograph it for the second post.

So here goes, my first pottery pieces since Mrs Garfield's infant class when I was around 6 years old (a very long time ago!!! LOL)


Note the duck, had to have a duck(!), on the roof.


Apologies for the spread out layout but its been so long since I posted - given myself a good talking to - I have forgotten how to arrange the photos.  Must do better!

See you soon with more photographs. 😘

Update:  I entered the little speckled green, thrown pot (second, top right) into the local craft/horticultural show and I got a third prize!  So proud of myself. 😍


Saturday 25 February 2023

Mad Hatter meets Slightly Crazy Daughter

So sitting here with a blank page as I am about start a project which not only is important to me but is also going to be full of stress, pressure and, I guess, tears - not to mention the swearing lol.  My eldest daughter is getting married and is wanting to do an afternoon tea for the small party of close family invited to the ceremony.  She is obsessed with the Mad Hatter from Alice in Wonderland - she also has a Cheshire Cat tattoo! - so I happened to mention doing place settings in the form of a hat using the label as the name card.  She likes the idea of the hat but isn't sure about the label so here I am looking for an image of the hat so I can make a 'mock up' to show her.

Now I have already made a top hat for the bridegroom panda I made a few years ago so I know I can make a top hat so I have the basic idea.  However the Mad Hatter's hat is a slightly different shape and I won't be able to make it with felt as this hat is smoother, almost leather-like, so am going to have to have a play with the fabric also.

I have just raided my hoard collection of fabric for something suitable for the mock up and found a piece which could be the right colour (blue for the wedding!) but not necessarily the right material.  To give it the stability I am going to try using a medium interfacing and try that out.  Now just got to work out the pattern...... wish me luck. I may be some time LOL.

So, paper pattern first.  Curling an A4 piece into a cone shape, I cut off the narrow/pointy end so it was an appropriate 'head' size then cut off the top so the bottom was narrower than the top unlike the top hat which is the same width all the way down.  I should probably point out at this time that the hats are about 2-3 inches high NOT full size ha ha ha.

This threw up the first issue.  Each time I tried to straighten up the wider top, I took more off the height leaving me with a hat 'body' even I thought was too small. Ok then. Minimum swear word and recut.  This second time I cut the top as if I was cutting a circle and that worked better than the first attempt.  Mirrored the curve on the bottom and I had a level top and bottom. Result!

Measuring the width of the top gave me a starting point for the top.  I knew I would need extra on the top as the tabs used to fixing it to the main body would be cut from it so again, this took a couple of attempts before I was happy that the piece would fit.  Second issue: narrow end too narrow to get fat fingers in to secure top from inside.  Might have to look at fixing top on the outside and adding a second layer of outer material to hid the tabs if I can't work this out.

So now the final bit, the rim.  Looking at the many (many) images of the hundreds (!) of images of the Mad Hatter's hat, they all show a 'wavy' rim rather than a straight one on a top hat.  However, at this point I am thinking that a straight one could be moulded into shape.  I think if I was to use some PVA on the material and mould it whilst it's still wet, that would have the same effect.  So here goes....  Complete failure, lmao. Cut the hole in the middle to fit around the wrong end of the main body so started again. Medium swear words!! 

So here it is - the finished prototype!  I know the rim is too high up but apart from that, this pattern looks ok.  Now I just have to make a proper trial version with material and with all pattern pieces tidied up and measured properly - not just using the roll of carpet tape as my template lol.  So the process will be the same - give or take a few tweaks and swear words - so will post photos of the finished one.  If I hit any other snags I will add them to the story so that I a full 'warts n all' reminder to keep my mouth shut in future!!  See you later :) 

Ta-Da the final photo.  Excuse the spots of wet glue but this is the result of my labours.  The name label is one of the experiments by Emma and Tom (bridegroom) writing done by me just as a 'doo-fa'.  Looks ok and am happy, Emma thinks it's cute so I think she likes it too.

Note:  As I was looking for a totally different pattern for another project, I came across (yep, you're already ahead aren't you!?) a pattern for a mad hatter's hat!!  Basically same as mine so was a little smug but obviously annoyed that I hadn't done a search first.  I also came across another pattern using an upturned paper cup as the base for the main hat body.  We now have two different sizes of cup and this is the next project once (secret) project 2 has been completed.  Gonna be busy! :)