Wednesday, 7 October 2015

Dino (part 2)

Well I rejigged the pattern I had made and made the neck a little more vertical.  I searched my stash(es) of material to see if I had any blue material - not something I was aware of as most of my material is old curtaining, pieces of end of roll, bits picked up at rando and blue isn't a colour I go for.

Anyhoo, I happened upon a piece of cotton that I found in a basket of off-cuts which had white spots on and it coincidentally was the right size for the pattern - yeah I know right?  Everything happens for a reason.

I didn't think that the cotton would be strong enough to be man-handled as I thought the toy would be so I continued on and managed to find a piece of lining cotton.  Pieces of felt were also brought out and compared until I had the right colour - red - for the scales, feet pads and eyes.  All done, I set about cutting and sewing.

I doubled up on each of the body pieces - two spotted front and back, two lining pieces to match - I wanted to be doubly sure that he was strong enough to put up a fight with a 7 year old.  As you can see I corrected the shape of the neck to make him stand taller rather than look as if he was eating off the floor, then it struck me, I could have used my giraffe pattern! DOH!! Anyhoo it was too late by then and I was pleased with my solo effort so no harm done.

The felt was a real pain to sew with!  I hadn't used it before and the fibres kept getting caught in my needle.  Fortunately, as I was using Lucy (my hand-crank), I was able to stop and start lots of times to clear the clog but eventually (and with a few more coppers in my swear box), the toy was done.
When I stuffed him I tried to make sure that it was done evenly and tight in the neck again to help make it stand up.

To be a little different, I trawled the t'interweb and was able to find a small teddy growler.  This is a small cylinder which, when tipped to one side, growls.  I remember a lady made me a large teddy bear with one of these inside when I was little and I loved it.  I thought the little lad would and also it would be 'different'.  It came a couple of days later and I was able to put it into the tummy before I finished the stitching.  

I love my Dino!  The finish is clean, the stuffing was smooth and the material suited the project.  The only think I wasn't happy with was the growler.  It worked intermittently and it was a little on the quiet side - not that I wanted to frighten the little guy, but I wanted more of a roar than a meow. 

Anyhoo, I loved it and apparently when the little lad received it, he never let it out of his sight all day!! I would call that a result.
See you soon  :0)

Monday, 22 June 2015

My Brachidiplodocaurus Dinosaur

Following the success of Gerry, my giraffe (see previous post), I was asked if I would be able to make a dinosaur........?  Thinking I might possibly be able to find a pattern, I set about looking for one. Unfortunately I didn't much like the free ones I found so wondered if I could make one by simply combining my Nelly and Gerry patterns.............. (did I say simply?? oh dear!!!)

With a little selotape and a lot of imagination, I tweaked and twisted and finally came up with a pattern I thought I could make up.  As it turns out mine looks like a mixture of Brachiosaurus and Diplodocus dinosaurs: characteristics from one are mixed with the characteristics of the other - totally unintentional but quite cool....

Anyhoo, as readers will know, I always make a trial product up so that any tweaks to the pattern can be made enabling me to correct anything along the way or add notes to the instructions so that any subsequent makes, go smoothly and with fewer - if any - mistakes.

I found a piece of flannelet which I then cut out using my pattern and, due to the texture of the material, used my pinking shears 'just to be safe'.  Not entirely satisfied with the size of the discs for the 'paws', I cut three different sizes.  I will use the larger of the three in the first attempt and will probably tack them in by hand so that if they are the wrong size, I can easily remove and replace them with one of the other sizes.

First I worked out where I wanted the eyes to be.  As I hadn't asked the age of the person I was making my dinosaur  for and googly eyes are not something that I keep a stock of, I decided that I could save any risk of him swallowing a button by sewing an eye on which was made out of the same material I was going to use for the 'paws'.

Using my large stock of buttons to find a size which worked, I traced the outline of the eye onto the pattern which I then cut out.  I then marked the wrong side of material with the shape of the eye and then used the same button to cut out the shape from the material I was going to use.

To keep the material in place whilst I sewed it on - too small for pins and fiddly for my huge fingers - I sprayed a small amount of Gunold® KK100 (fabric adhesive) to the eyes which I then fixed permanently using a small running stitch on my machine as close to the edge of the felt as I could.

I then pinned the leg pieces to the main body, right sides together. Then sewed down the back of the legs, the in between bit and front of legs of one side, right sides together.  I remembered when I had made the elephant that the 'paw pad' circles were sewn on after the leg pieces had been sewn together so I followed the same procedure here.

I checked that all the seams had been closed securely and then began 'fighting' with the 'paws' to get them into position on the end of the legs.

The larger of my felt circles were too big so I unpicked the tacks and tried the middle sized ones.  These were great and so all four were added to the bodies I had just sewn.  These were sewn on with the leg material to the top of the two pieces under the foot of the machine and the felt pads on the bottom.  Slowly but surely is definitely the motto here!


The body was beginning to look something like!


I asked if it was alright to add bits onto my dinosaur which weren't on the 'original'.  Apparently the young guy I was making the toy for has ADHD so I didn't really want to do something which could affect him.  I was informed that this would be ok, so I cut out some scales for the dinosaur's back.  I cut two lots as I had done for the paws and eyes so that I could compare colours and see which I liked best.

The dark green felt I had chosen for the paws, also looked good as the scales so I decided to use these.

Both pieces of felt were sewn together, giving the felt a little more body and stability.  At first the machine did not like the felt - see picture right - but with a little tweaking of the tension and stitch length, I managed to get it done

The scales were then pinned to the right side of the neck of one of the body pieces with the scales facing down.

This done, I started to assemble the dinosaur proper.

The first part is to sew the tummy bits together, remembering to leave a gap so that you can stuff the animal once it is finished.  I have learnt from the two Nellies I have made that to ensure the seam doesn't come undone or rip whilst you are stuffing, double back a couple of times on the start and finish of the two seams either side of the gap.

The legs need to be pinned out of the way of where the seam is going.  Pin them up on the wrong side of the body pieces so that you can sew the seam on the belly correctly.  When you are ready to sew, pin the body, right sides together and sew the belly ensuring that you don't catch the folded area in the seam.

I then rearranged the body and pinned it together ready for the final push.  The sewing was quite easy but when I came to turn him inside out, I realised that I hadn't left myself a lot of room for stuffing. There were also some places along the tail where the seam was coming undone.

I turned him back inside out and used a small zigzag stitch in the places where the original seam was a little too close to the edge of the materials and had come undone.  He was then turned back the right way and stuffed.
I am quite pleased with my first attempt and it is the first thing I have made without a pattern.

I can see now that the neck needs to be lifted on the pattern and needs to be smoother between the body and the neck - i.e. straighter without the dip.

I also need to make sure that the seam allowance is the same all the way around - the tail is a little lumpy.

All in all, not a bad first attempt and he will take his place on my recently culled bookshelves.  I now need to find some plain blue material and contrasting one for the paws, eyes and scales.  Watch this space - coming to a blog near you..............  :0)


Saturday, 13 June 2015

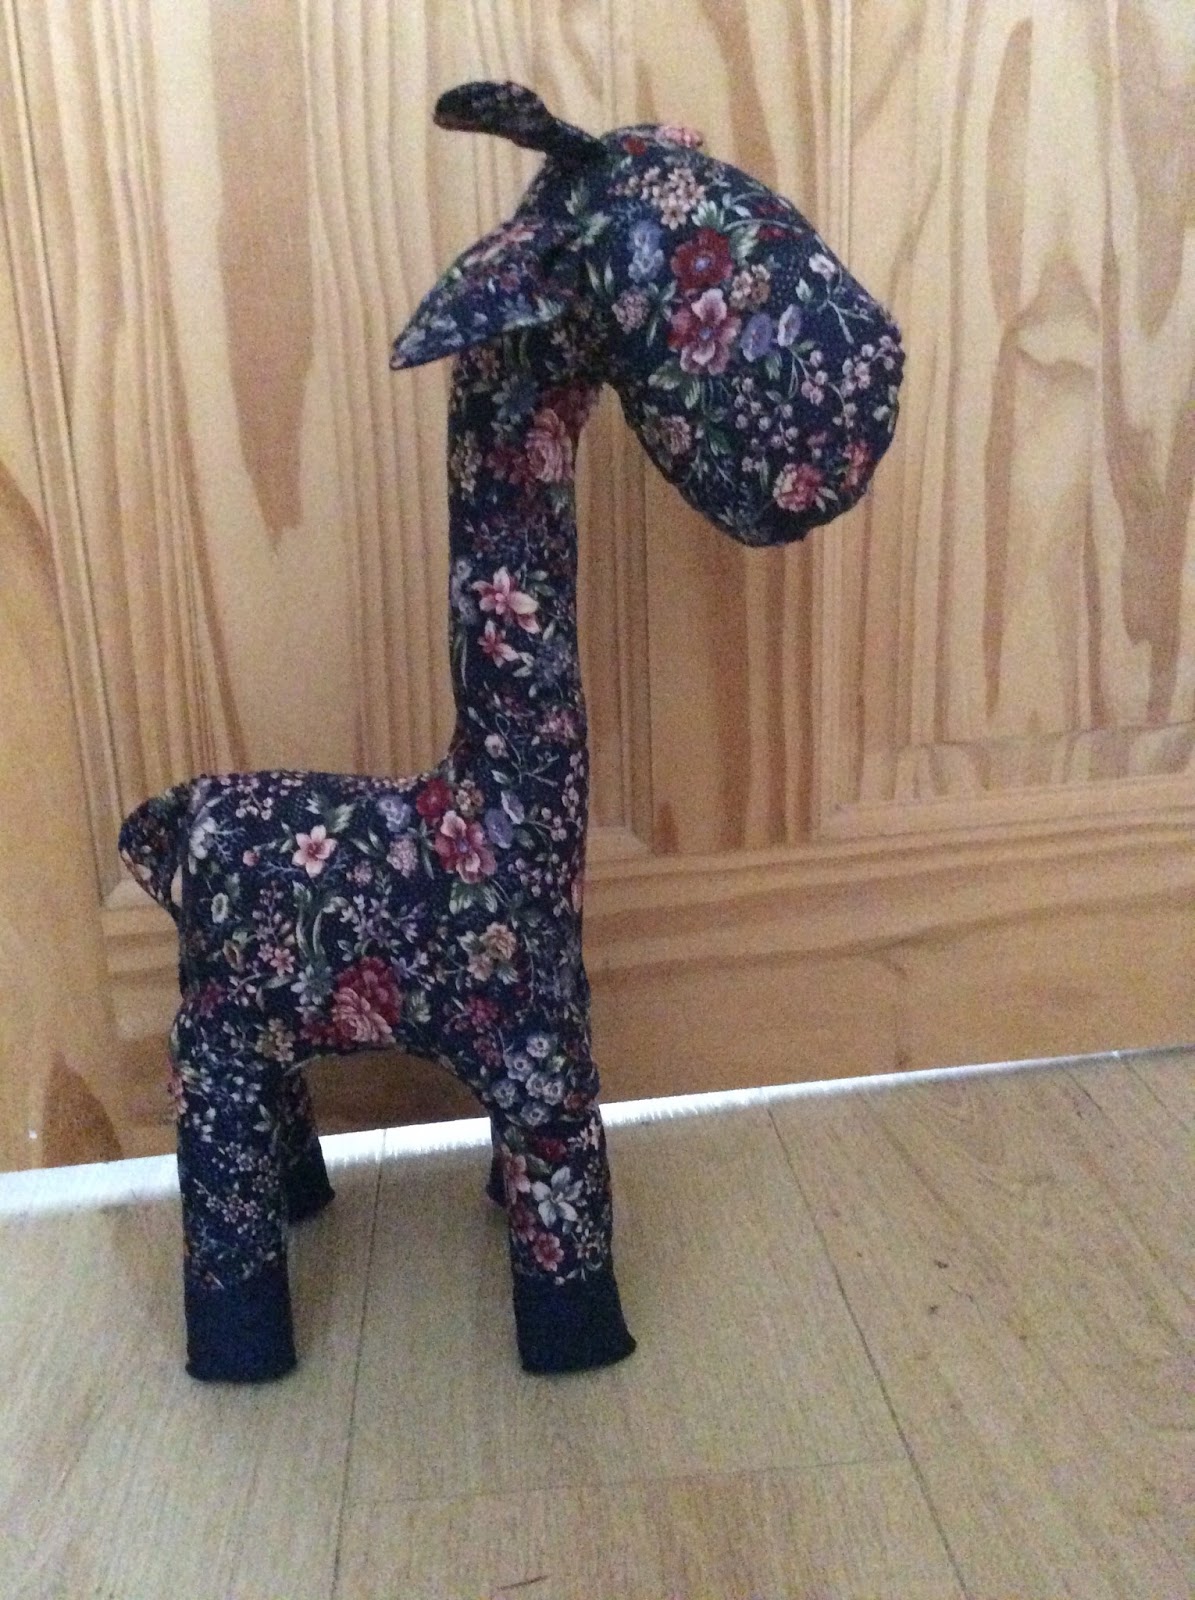
Gerry's in Town

Well today was my first Saturday 'me' day in a long time. I have been part-time at work this week only doing two days and have filled the other three doing the garden and reclaiming the house from the dust bunnies! I therefore felt that I deserved the day off and would spend it doing some sewing.  (What I don't tell you is that I had a ton of washing to do and the weather has taken a turn for the worse - raining - and my tumble dryer has just bitten the dust!! so what I had planned to do wasn't going to happen anyway).

Having had a disastrous first attempt - usually the way to go with me anyway (see any of my previous posts) - I had enlarged the original pattern and taken care to cut it and my next choice of material out.  (Daughter left iPad out so was able to take photos of the start of the project. material shown is the wrong side out......)

Having returned from purchasing a new tumble dryer, I made the obligatory pint of coffee, set my CD off - Mark Billingham's Lazy Bones - and began to sew.  It was so much easier with the slightly larger pattern - my fat fingers were able to manoeuvre the material through the machine - electric (!) one - and soon I had all the pieces made, ready to put together.  I ironed all the seams I could and began to sew them together.

From the first attempt you will remember I had extra bits of material sewn the wrong side so that when I turned the sewing the right way round he had inappropriate bits between both his front and back legs - see previous post.  I was so careful this time so make sure I did this particular part slowly so as to get it right.

Anyhoo, I was so pleased when I did finally turn it the right way around when there were no extra bits sticking out anywhere!!!  I then set to and stuffed his legs, head and neck and the shape began to emerge.  The last few stitches were then added to close the opening on his tummy and eh voila!  Here you go - the finished article.

A little more stuffing in one leg and little less in another but apart from that tiny adjustment, I am so pleased with him!

Now what next????  :0)

Wednesday, 3 June 2015

You're having a giraffe!!!!

Well, this week I decided that I wanted to try another soft toy and came across a pattern for this giraffe - cutie-pie!

I sifted through my 'hoards' of fabric and found a couple of combinations that I thought would look ok and set about cutting out the pattern and the bits of material.  Wanting this to be as good as I possibly could with the 'trial' run, I took my time and spent one night tracing and cutting.  Due to the material type, I used my trusty pinking shears and decided that I would the use the electric machine.

As with previous projects, the first attempt is the trial run where, if I come across any problems, I make a note on the pattern for the second - hopefully better - run.  I started around 8.30pm - hubby fast asleep on the couch snoring so tv was out and it was too early to go to bed!  I finished it around 12.45 and just went to bed.

When I got up this morning I turned the giraffe the right way around and groaned.

I have obviously slipped up when I was sewing the two leg parts together as poor old Gerry has extra bits in between both his front and back legs.  Think I am going to have to practice this part of the project a few more times before doing the 'proper' one.  I am also thinking of cutting the pattern a little bigger - can't have a giraffe smaller than an elephant!! lol

Watch this space.  :0)


Saturday, 23 May 2015

WALLET TOTES

Having finished the quilt, I decided that I would take things a little easier and go back to trying out bag patterns.  This turned out to be a really good idea.  I had pattern for a two tone tote from one of the free sites which I had just the right fabric type and colour for.  I cut it out and virtually had it done in a couple of hours - this is a record for me, a personal best - and I had used the electric machine! The bag was finished the following day and given to my Aunt to use on her holiday this week. Needless to say, she loved it!

       I didn't take photos as I went along because I was 'in the zone' and on a mission to get it done.  
      Plus my antiquated mobile doesn't take them and there wasn't anyone around who could.  
      Must get this situation rectified!  Here are the two bags done.

So now bereft of any projects, I sat with files of patterns to select my next one.

I found this project - Wallet Totes - again from one of the sites I trawl and thought (in a moment of insanity) that it would make a good project and give me some more practice of working with zips. I have made two Kennedy bags (see previous posts) and they had zips, I have also made a quilted cosmetic bag but really, three zips done; more practice required.

So I spent last night selecting materials, finding zips and cottons and cutting out.  As it was still relatively early, I then put three bases together to the zip part and then did one, just to try it. Success so far.....  I also managed to find hubby's phone and took a sneaky photo just as I was about to start sewing........

The zip sewing took a little practice - the first one zip I sewed I sewed too close to the teeth and then couldn't fasten it up.  I unpicked the zip but unfortunately there was not enough of the pink material shown in the photograph above to recut the bottom pieces so I now only had two examples cut....

I then managed to sew the second one - the pale blue one - inside out (!) and due to the weave of the fabric, I couldn't unpick it without spoiling either the zip or the material.  I was getting really frustrated now so I switched off the machine and went to refill my cup.

Taking a deep breath, I began my final cut example.....  They say thrid time's a charm and it was!  It went really well.  The zip around the whole bag bottom went so much better than I had expected - still not completely happy with it as there is a little 'pleat' near the zip head when the bag is open.  However here are the finished photos of the bag; closed, outside and inside.

I now have a few more larger zips where I need to work out how much larger I need to cut the base - I can hear you groaning from here, stop it!! I know maths isn't my strongest subject but I think I can so this...  The finished bag is a little on the small side, but my Aunt (my bestest 'customer') loves it and uses it to carry books in when we find them on our travels......

bag fully closed

bag open - outside
bag open - inside

Tuesday, 19 May 2015

Bottom's Up

I have for some time now, wanted to re-cover the seat and back of my chair.  I 'inherited' the chair and it wasn't in a particular good condition then but over the years, the seat had slowly become more thread bare and the material on the top edge of the back was getting very thin also.

I found a pattern for a slip cover and put it to one side with a view to doing at some point when either I had to or finally had the time to do it.  I knew that I would need time to think about how I was going to do it as the chair I have is very different to the one shown on the pattern.  Let me explain......

'Normal' typing chairs have levers underneath the seat where the user can adjust the height and position of the seat along with maybe another for the position of the backrest.  However mine is slightly different - see photo.......

The seat does indeed move up and down but there is no lever; there are two 'locks' either side of the seat and they are quite bulky.  The pattern I had was for a slip cover which effectively had a drawstring type of fastening which, on examining my chair, would not work with my design of chair hence the reason to have to think about the pattern.

So, one rainy Sunday I bit the bullet and sorted through the (many!!!) boxes of material I had and came across a piece of heavy cotton which had a design in the middle I felt I could 'fussy cut' so that the design was centred on both the seat and the back rest.

I needed a pattern so began taking the chair apart so that I could (hopefully) remove the remains of the existing cover as a template.  I couldn't work out how to remove the seat pad from the seat. Several attempts, scraped knuckles and after I had unscrewed all the visible screws and getting nowhere, I finally lost my temper and 'attacked' it with a very large screwdriver.

Instead of it breaking or chipping, the seat unclipped.  What a surprise!  There are four clips which grip the metal edge of the seat in strategic places on the seat.  Well this was now so much easier!!!

The original cover had been stapled onto the seat pad and so again with the screwdriver, I attacked the material which, was so badly worn, came out of the staples very easily.  I then realised that the seat pad was really thin at the front of the seat.

Along time ago, my Mum wanted to recover her headboard and bought some material which I guess is used by upholsterers to use for this very purpose; it is heavy duty material which is difficult to cut, does not tear and is quite thick.  She used it very successfully for her project and I thought that I could use some of the remaining 'hoard' to re-line the seat.  So I found a large enough piece and cut a pattern wisely marking the front of the piece so that I didn't make a mistake!

     Readers of my blogs will already be familiar with previous lessons learned - pins and 
     soft tissue do not mix, care required when counting (especially quilt squares), placement 
     of  embellishments (especially close to the seam) and obviously checking you are sewing
     the correct side to the correct side so that your final piece isn't inside out!!!

I then checked that this piece would cover the whole of the pad with sufficient spare material to be 'gripped' by the seat/pad.  There was so I then used this template to fussy cut the top material.  This particular part of the project was the most frustrating.  I eventually pressed a cross in the middle of the material where the middle of the cross was more or less centred in the middle of the design and tried to line it up with the middle of the head boarding material.  I think I did a pretty good job when you look at the finished cover, but it was pretty tense in my sewing room..........

With the use of my recently re-found stapler and spray glue, I managed to recover the seat.  I was really very pleased with the result.  With that done, the back was a breeze!  I followed the same process and again used the spray glue and stapler to fix the material to the rest.

I borrowed my daughter's iPad in order to take the photos.  Unfortunately the lighting in my sewing room isn't studio quality and that's why the colours look different on both parts.  I can promise that they are from the same piece of material and the seat in the photo here is the 'proper' colour.

Not bad, even though I say so myself.  Feels much comfier too with the additional 'padding'.

I then stated that the chair my husband uses at work was in more of a sad state than mine had been and so I asked him to bring his chair home the following weekend and I would 'overhaul' his too.  As you can see from the photos, it should really have been condemned to the skip!  Nevertheless, I washed it (which made a HUGE difference), and then used a piece of upholstery fabric to recover the seat and back rest.  This time the seat was screwed to the base of the chair and so I had to also then remember which screws went where when I put it back together again.

This is the seat pad - or should I say what's left of the seat pad!!!


Finished chair.  Another project which success relies on the choice of fabric.

Hubby is really pleased - especially as the additional padding means that he can't feel the ridges of the seat base!


Monday, 16 March 2015

First Quilt (proper) part 8

HOOOORRRAAAYYYYY

Yes its actually finished.  I finished yesterday (Sunday 15 March).

To be honest I had been putting off the binding as I just couldn't get my head around the mitering aspect.  I have watched video after video and even tried it out on the sample mug mats but even then, the corners didn't look right.

The weekend was going to bad anyway as it was the anniversary of losing my mum and Mother's day so it was going to be a toughee!  However, there was also two hockey matches on - one Saturday, one Sunday - so I decided to bite the bullet and use them to my 'advantage', take my mind off my troubles and just do it.

I made the binding on Saturday.  I cut 3" strips which I then folded in half and then folded the edges into the middle making one side a little wider than the other (tip from one of my videos).  You will know - from previous blogs - that my maths isn't that hot (72 squares etc etc....!) so I didn't bother measuring the entire outside of my quilt to make sufficient binding, I winged it.

The binding was placed to one side and I again trawled the net for alternative methods for finishing my quilt along with any other binding 'how tos' just in case.

Sunday came around and I set my stall out......  computer loaded with Miss Marple stories on CD, angle poise light correct positioned, Lucy freshly oiled and loaded with a full shuttle bobbin and three spare (just in case) and the obligatory pint of coffee.

I set off pinning the binding to the back-side of the quilt but then realised that I didn't need to do this as the raw edge of the binding ran along the edge of the quilt.  This saved time and fingers being pricked.  Lucy 'chomped' through all the layers and the stitching was just right.  I followed the instructions for the mitred corners and was pretty pleased with the back.

When I reached the beginning of the binding (the other end) I trimmed off the excess - like I said, maths not my thing - there's loads of binding left!! - and managed to make quite a neat little join.

The problem started when I got to the first corner on the top side.  There was far too much binding!  I couldn't understand what had gone wrong.  I had followed all instructions even to the point of slowing the video and practically going frame by frame so I didn't make a hash out of it.   Pointless!!

Anyhoo, after quite a lot of folding in and folding in again, I managed to get them something like but not even close to a mitre.  They are neat (I think) and tucked in, not ruckled or anything but not what I wanted.


Needless to say, my first quilt is done!  This is the view of the back and closer view of the stitching in the ditch .....
 IF I ever decide to try another one, I will find a pattern a lot easier to do and chose something other than denim to make it out of.  Mind you, for now, I'm gonna quit whilst I am ahead and get back to some 'quicker, easier result' projects and I already have a list!